First, you'll need a few things to get started:

- Some type of glue that dries clear
- Clear glass ornaments- the size needed will depend on the size of your photo
- A photo of your choice, I chose one of my children
- Loose fake snow, Mica or glitter- I used the Sparkle Christmas Snow from the Bethany Lowe Designs Collection- it looks like Mica but is a lot less expensive!
- Scissors
- A small paint brush
- A funnel or paper cone- I actually used a large icing tip! It worked perfectly!
- Tweezers
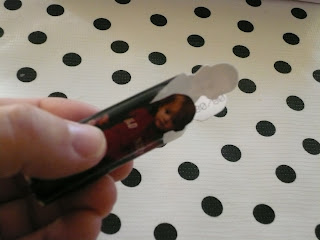
OK, so our first step is to cut out the subjects of our pictures.
 When you are done your image should look like the picture below.
 Grab your glue, a paintbrush and your clear glass ornament. Take the top off your ornament. The technique that worked best for me was to paint some glue on the bottom of the inside of the glass ornament. make sure you apply generously so that your picture will stick.

Next up, we are going to take our cut-out picture and gently roll it up to fit inside our ornament. Gently squeeze it into the opening at the top of the ornament, being careful not to bend the picture.

 Once the picture is inside it will naturally unroll a little. You will need to use your tweezers to gently coax it straight, upright and in the position you desire.
 Once you have it where you want it, you can set it aside to wait for it to dry. BUT, if you are like me and have no patience for such things, you can go ahead to the next step! CAUTION!! If you decide to go on the the next step before the glue dries, you may have to do some repositioning of your photo!
Now we will grab our funnel, paper cone or large icing tip. Stick it into the top of the ornament and slowly add your mica, snow or glitter. I used a spoon to scoop it into the icing tip. Fill until you have the desired amount. You can also add other things to the snow, like tiny charms and faux berries and greenery.

Lastly, we will decorate the top of our ornament. Choose whatever you'd like to make your ornament festive. Here are some examples of what I used:
 Now your Ornament is finished! Give them to teachers, grandparents, and other loved ones!
I hope you enjoyed this quick little, economical ornament. I'd love to see your finished ornaments!If you'd like to share a picture leave me a link in the comments.
Have a wonderful Holiday!
P.S Today is the last day of my 50% OFF Sale! That's right! Everything in my Etsy Shop is 1/2 off! Quick go!


1 comment:
Kelly~
Thanks for stopping by my blog! I really appreciate your comment and compliments!
I love this ornament idea, it looks precious. Glad to have found your blog and that you found mine!!
xo~Amelia
Post a Comment